Have you ever wondered what happens if the GST registration of any person is cancelled somehow or cancelled by him? How it is possible, what to do afterwards and so on.
If not then let us guide you with the help of this blog. Here, we will discuss how to file for the final return form GSTR 10, what are records to maintain after filing the form GSTR 10, and one can create the challan for it.
Let’s not waste time and clear all your doubts.
What is GSTR-10?
Any individual whose GST registration has been cancelled or surrendered will have to file a return in the form of GSTR 10. The GSTR 10 return is also known as the final return.
Who needs to file GSTR-10?
All the person whose registration has been cancelled under the GST laws has to fill GSTR 10 form. Here is the list of individuals who are not required to file this return:
- The input service distributors.
- A person who pays tax under the composite scheme.
- A non-resident taxable person.
- Any individual who is required to deduct the TDS under Section 51 of the CGST Act.
- All the person who is required to collect all the TCS under section 52 under the CGST act.
When is GSTR 10 due date?
One must file the GSTR 10 within three months from the cancellation date. For example – If the cancellation date is 1st November 2021 whereas, the cancellation order was received by 13 November 2021, then the GSTR will be filed by 13 December 2021.
What are the GSTR 10 late fees?
If the GSTR 10 is not filed under a designated period then a notice will be sent on the registered mobile phone number of that individual. Every person will be given only 15 days for filing the return along with all the necessary documents.
And, if the person still fails to file the return then the tax officer will finally pass the order of the cancellation with all the payable amount along with the interest charges.
How do a Final Return and an Annual Return differ?
A final return is filed by a taxpayer whose GST registration has been cancelled or surrendered under the GST rules whereas an annual return is a return filed by every active and registered tax-paying person.
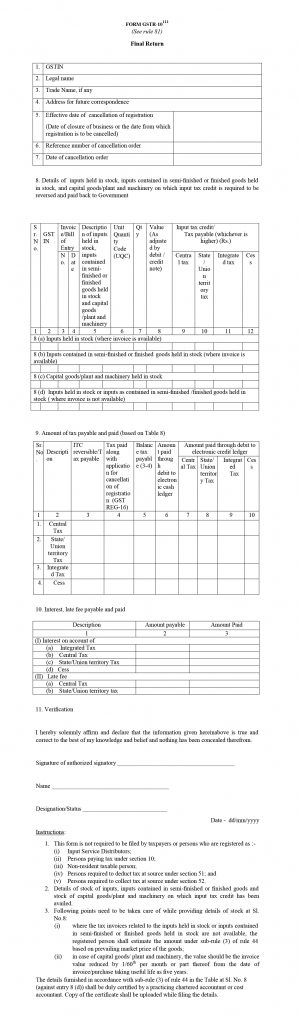
What are the details to be provided in GSTR-10?
There are a total of eleven sections in the GSTR 10 form. And, in every section, the information is automatically generated at the time of login.
But here we have described the information for a better understanding of the format of the GSTR 10 final return form.
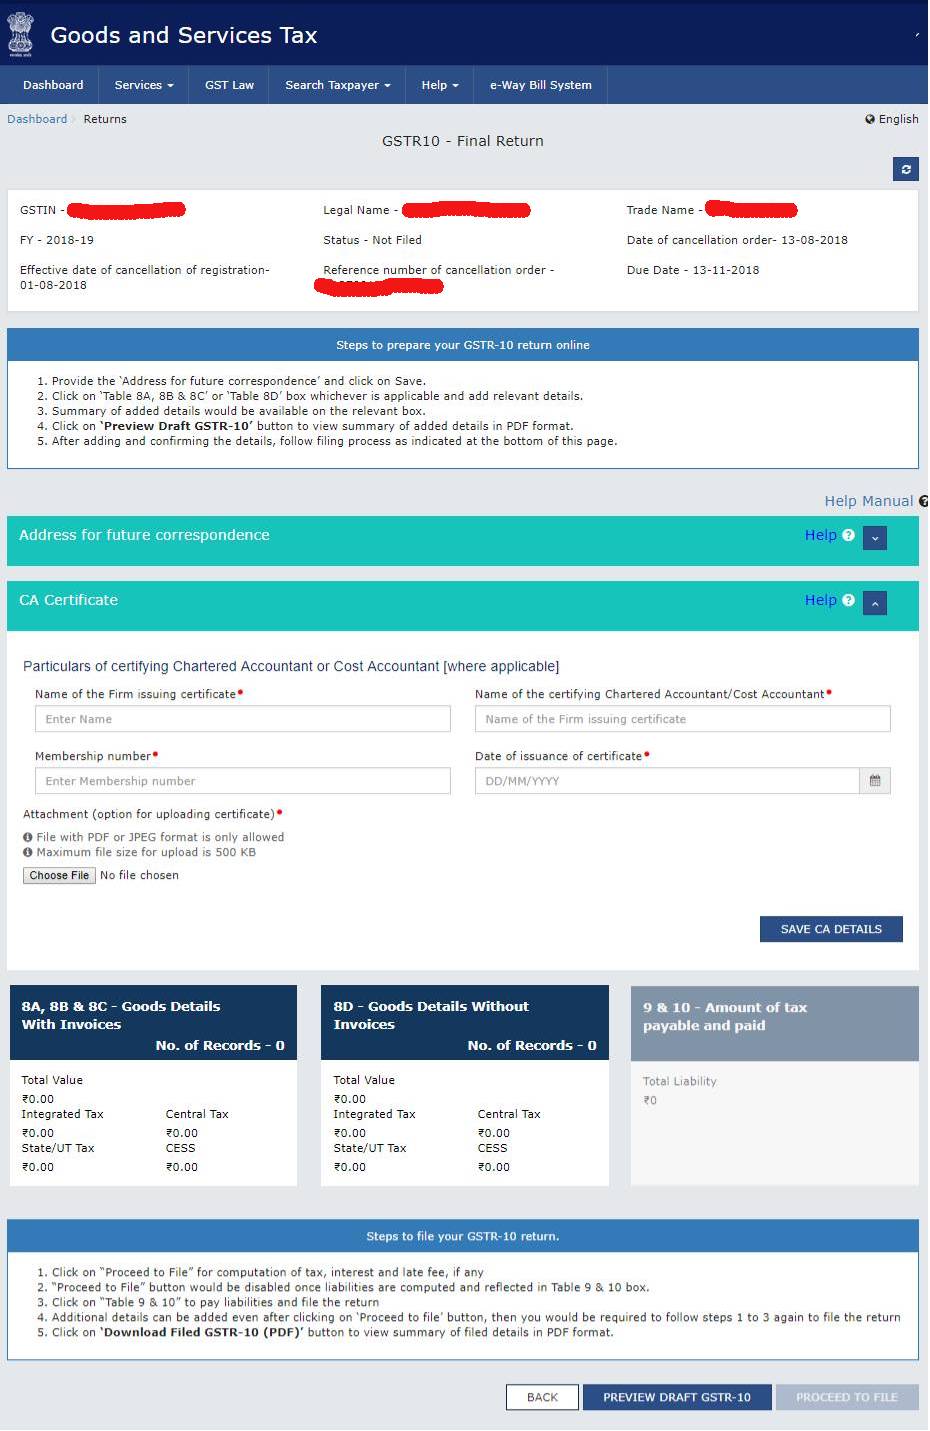
Section 1: The GSTIN of the tax paying person.
Section 2: The legal name of the taxpayer.
Section 3: The Business Name or Trade Name used by the tax paying person.
Section 4: Complete Address for future reference.
Section 5: The date of Cancellation or Surrendering the GST registration.
Section 6: The Reference number for the cancellation order. For this, a unique ID will be provided by the senior authorities at the time of the cancellation order passing through the process.
Section 7: The exact date when the GST registration was finally cancelled and the cancellation order passed by the authorities.
Section 8: The tax paying individual needs to provide the complete details of closing stock held at the time of cancellation or business cease time. However, if any amount is lying as a credit then it has to be paid during the filing of the Final return.
8.1 Input in the stock cancellation with an invoice.
8.2 Inputs in the stock of semi-furnished or finished goods with an invoice.
8.3 Machinery in stock or if any capital goods.
8.4 Inputs in stock of semi-furnished or finished goods when invoice is not present.
Section 9: Details of the tax payable or already paid. One has to give ITC reversal or tax payable or aid and transfer e-cash and credit ledgers according to the CGST, SGST, Cess, and IGST information.
Section 10: According to the head-wise breakup, one has to pay interest and a GSTR 10 late fee.
Section 11: Verify all the information and correct if wrong before submitting GSTR 10 as it is not revisable.
Now, the tax paying individual can sign digitally or use DSC (Digital Signature Certificate) or Aadhar Based signature to authenticate and validate the details of the final return.
Note: If invoices are not available for the declared stocks of inputs and these inputs include partially furnished or finished goods then the entire amount will be estimated in a different way. The calculation will be done in assent with CGST rule 44.3 at the present market value. And, this step must be certified by a Chartered Accountant along with GSTR 10 form.
One has to use the formula – Invoice Value – Value of 1/60th per month for declaring the value of capital goods or machinery goods. Especially calculated from the date of invoice or when the purchase was made by taking a useful 5 years.
Value of Machinery or Capital Goods = Invoice Value – Value of 1/60th per month
What is the format of GSTR-10?
Here are the images that can easily show you the format of the GSTR 10 form.
You can see the form GSTR 10 here and download it as well for reference purposes.
Click Here to Download -> GSTR-10 Form Download
How to Create & file GSTR-10 on the GST portal?
Here is how you will create and file GSTR 10 on the GST portal.
Step 1: You have to log in to the GST portal – www(dot)gst(dot)gov(dot)in/
Step 2: Fill in all the credentials.,
Step 3: Hit the final return. First click on the services tab then returns and then click on the final return. You can show in the image as well:

Step 4: Press on the Prepare Online option.
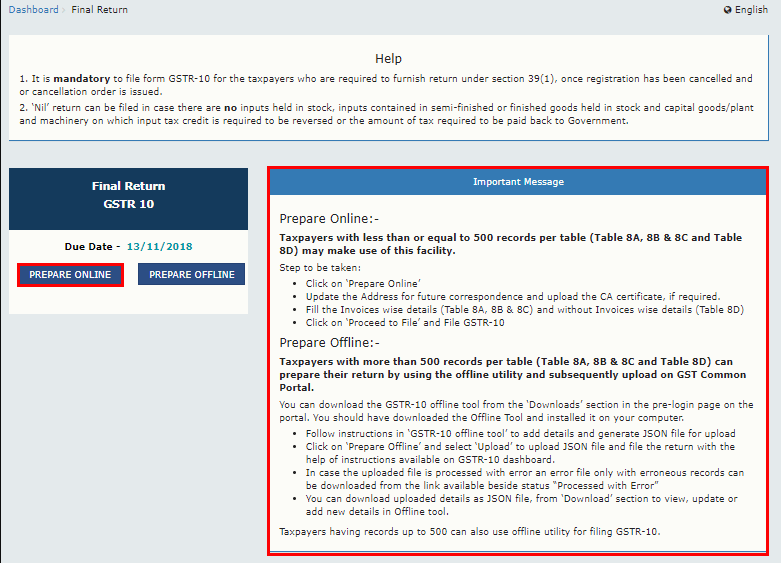
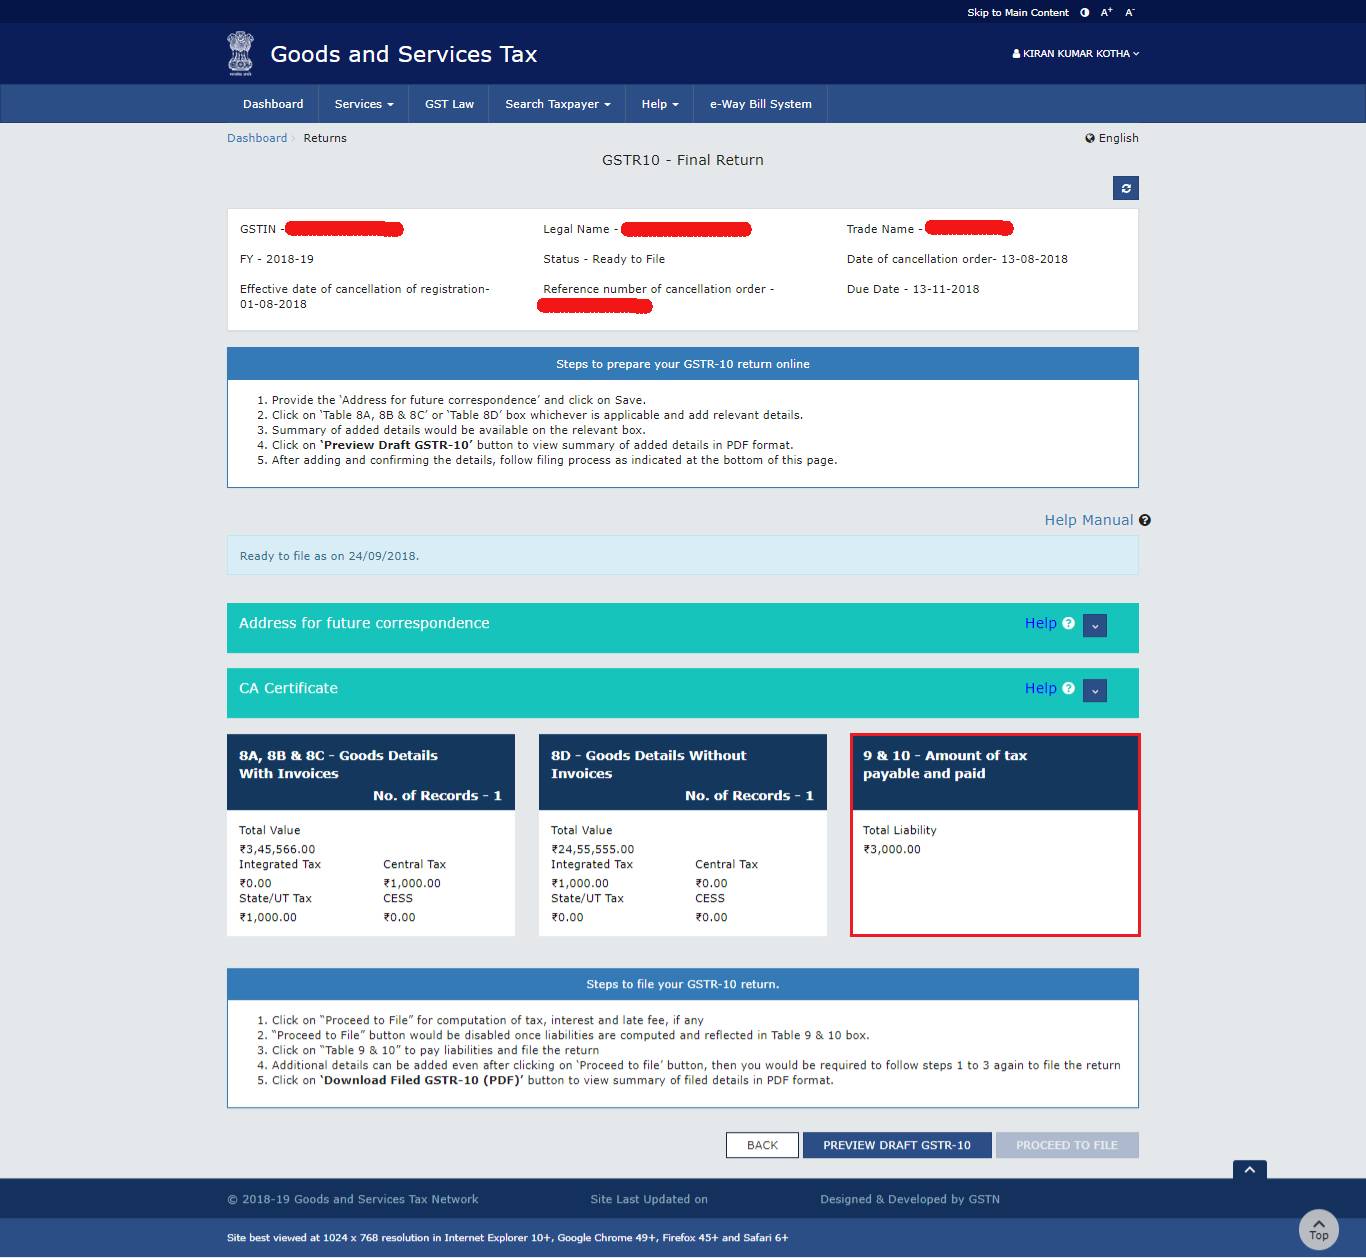
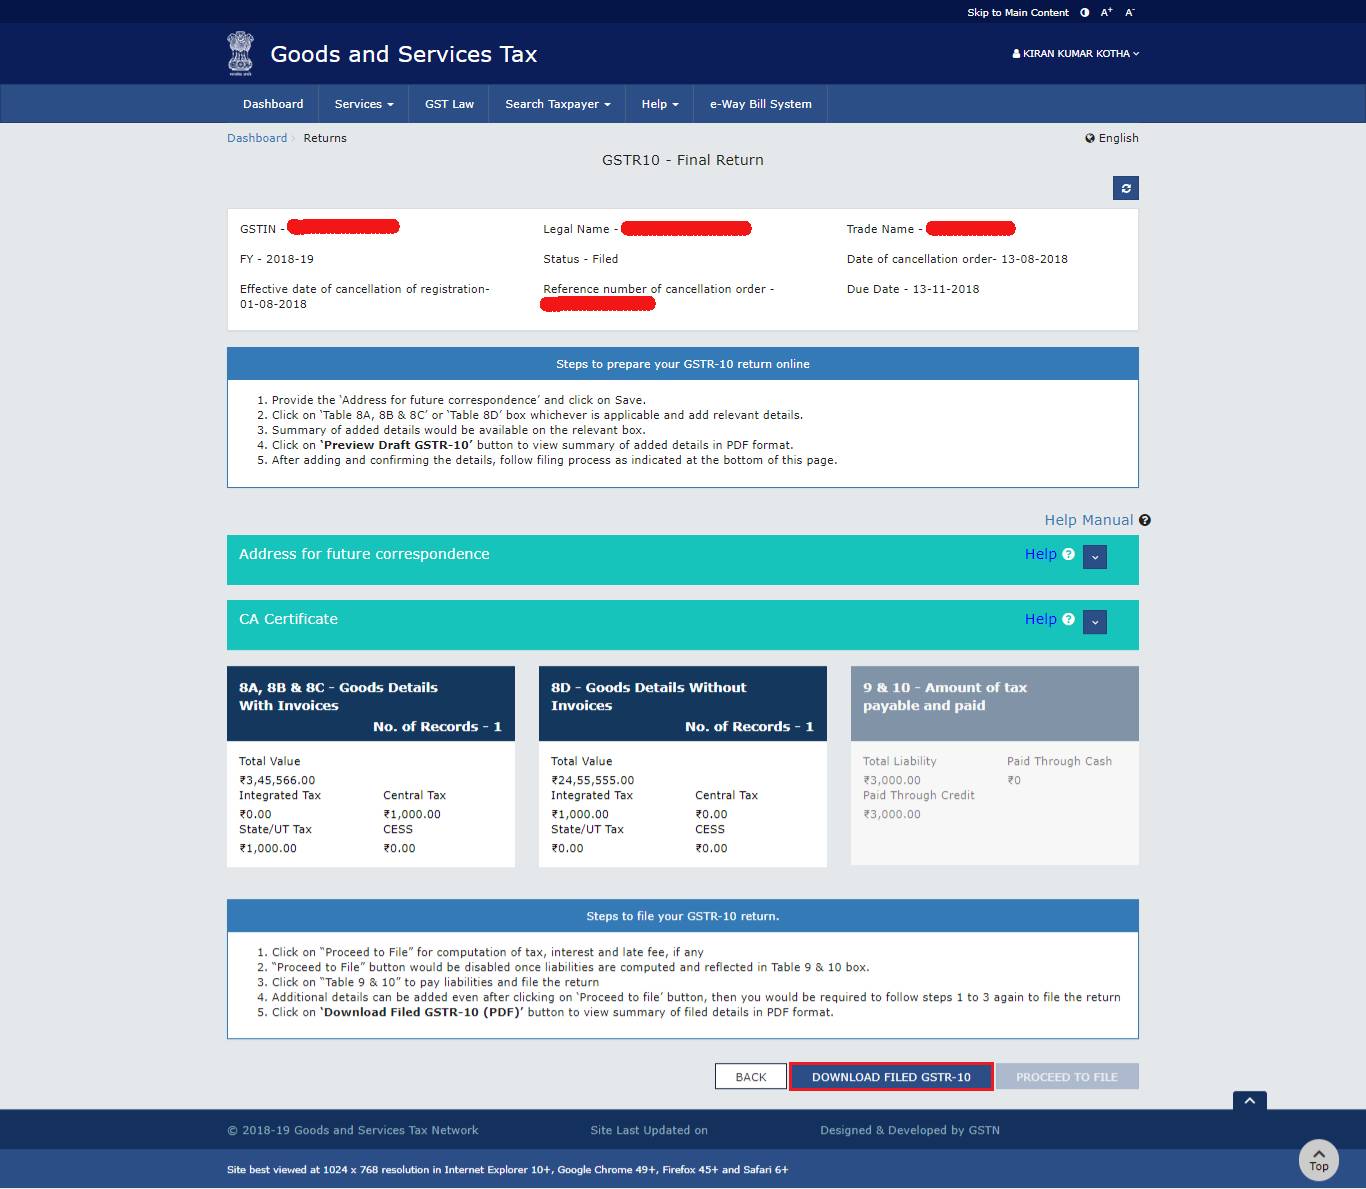
The dashboard of the final return is displayed on the screen as shown in the image below.
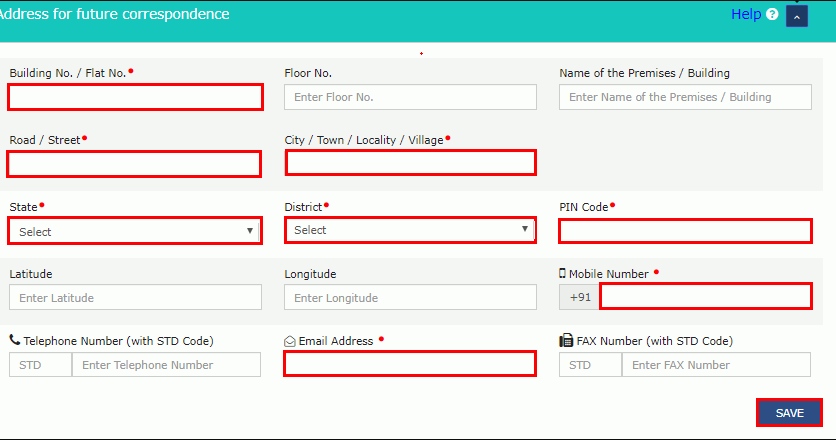
Step 5: Now you have to enter the address.
Step 6: Press the save button.
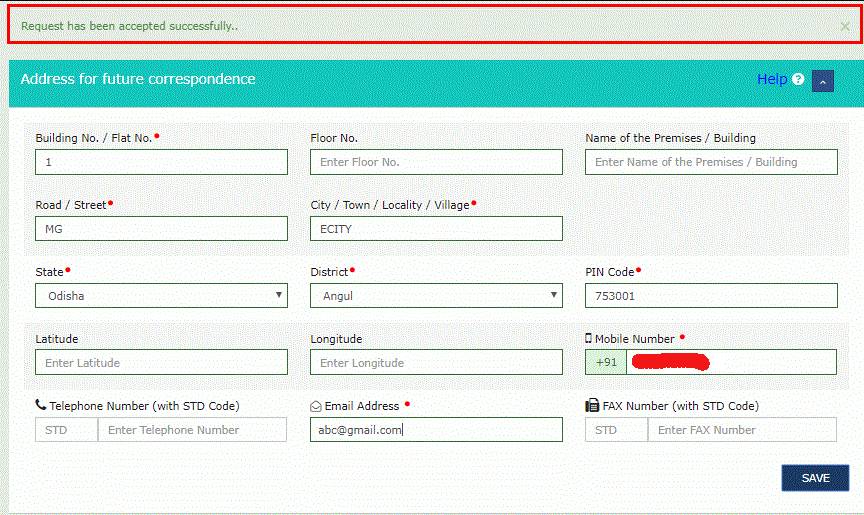
Once it is successfully updated, a success message will display on the screen.
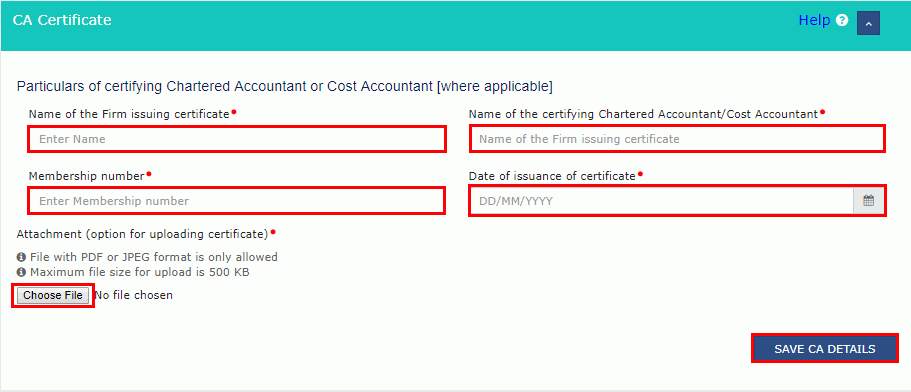
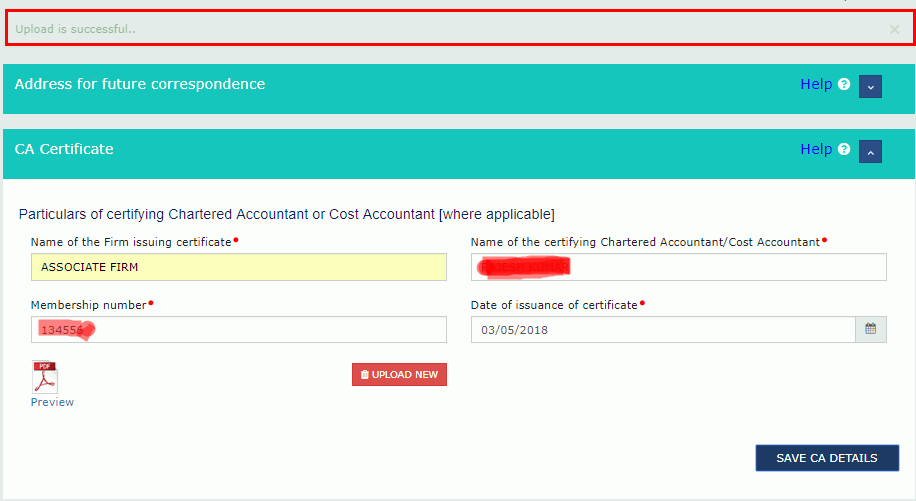
Step 7: The tax paying person has to update the details of the Chartered Accountant. You have to enter the following details:
Name of certifying accountant firm, cost accountant in the firm, membership number of certifying firm, and date of certificate issued by the accounting firm.
Step 8: Upload the Documents after scanning them.
Step 9: Press the Save CA details option.
After the succession upload of documents, a successful message is displayed on your screen.
Step 10: Now, you have to fill various text boxes as explained below:
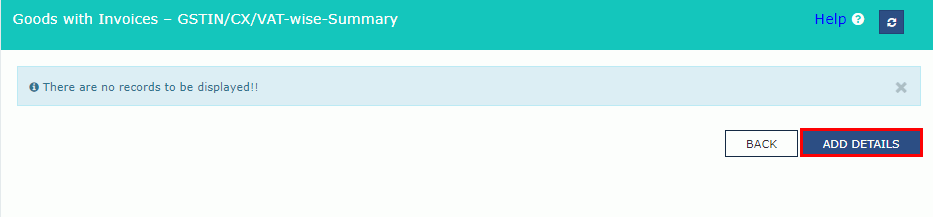
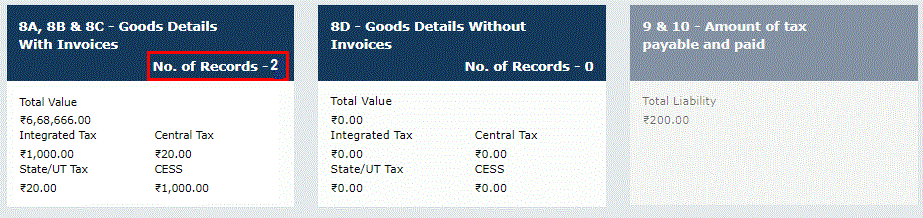
For Goods with invoices details:
- Hit the option of ‘Goods Details With Invoices
- Press on the ‘Add Details’ option.
- Select Registered Under from the drop-down list.
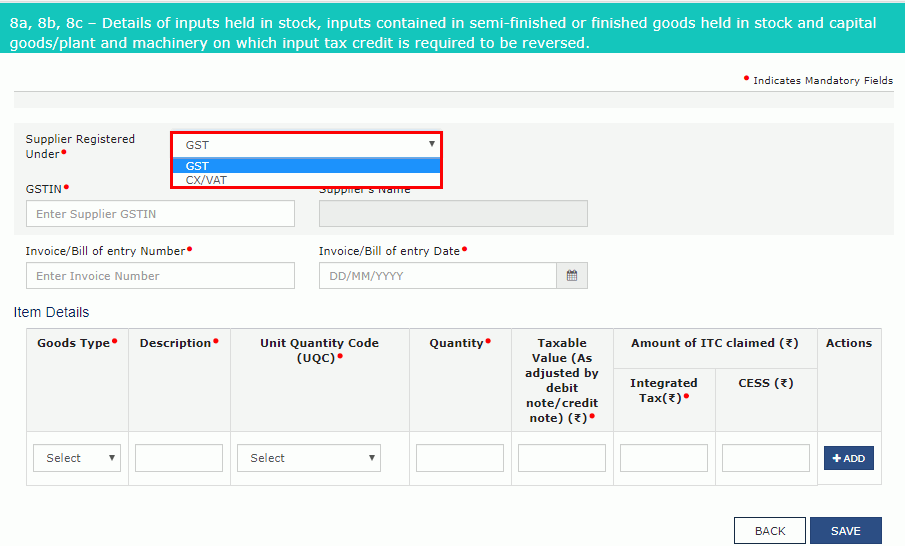
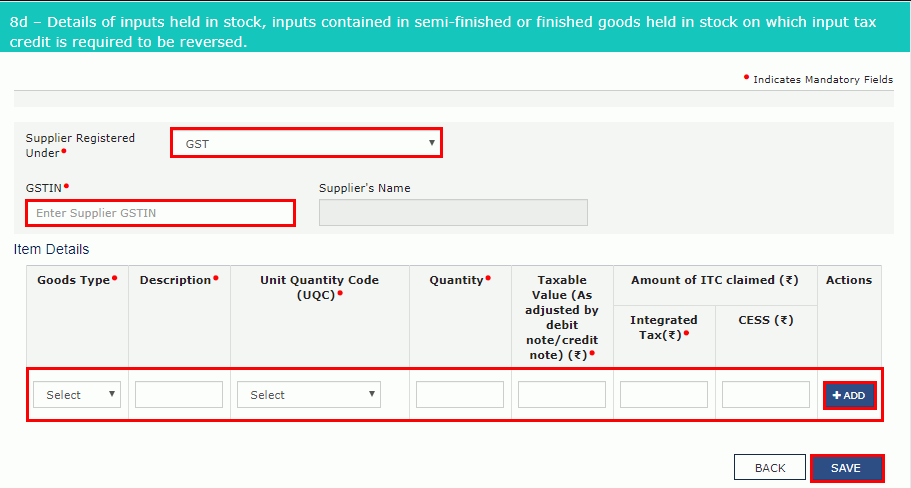
- Select the Supplier Registered in GST Regime by entering your GSTIN, invoice number, date of invoice, details about the goods, and then hit the add option and press the save button.
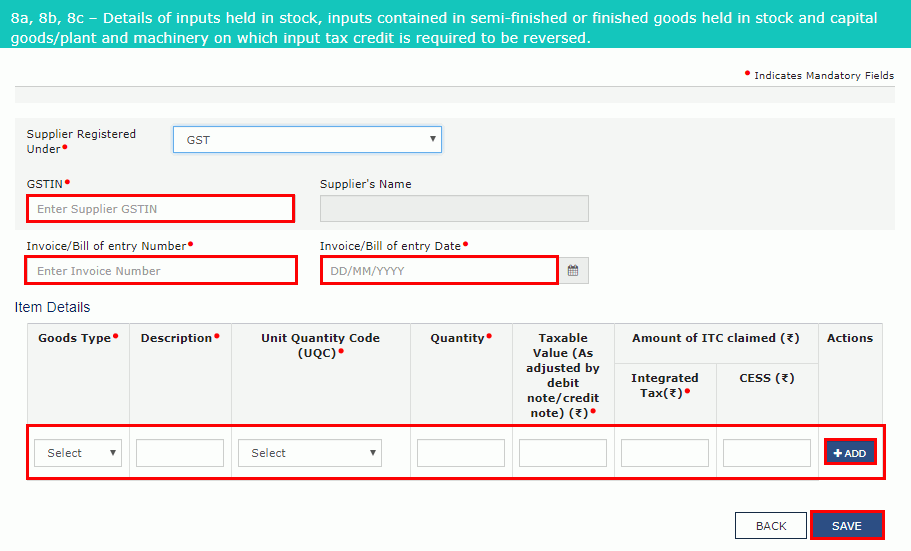
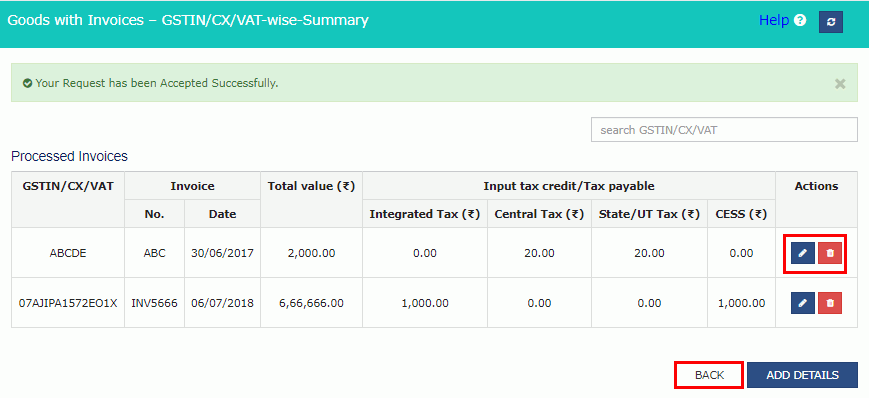
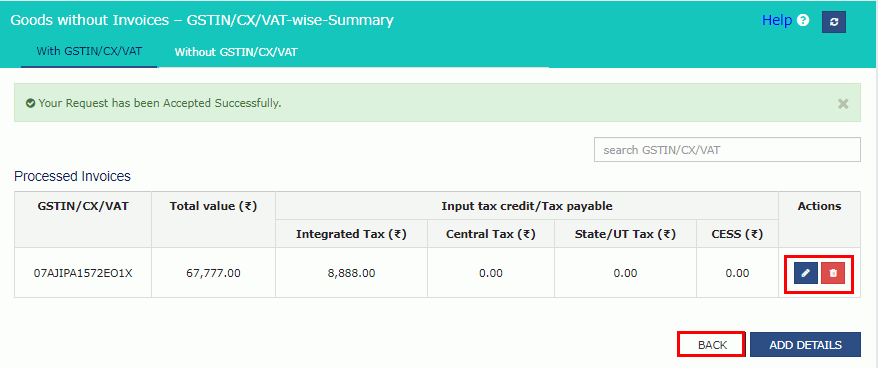
As you can see in the below image a success message will be shown. As a tax-paying individual, you can edit or delete the invoices.
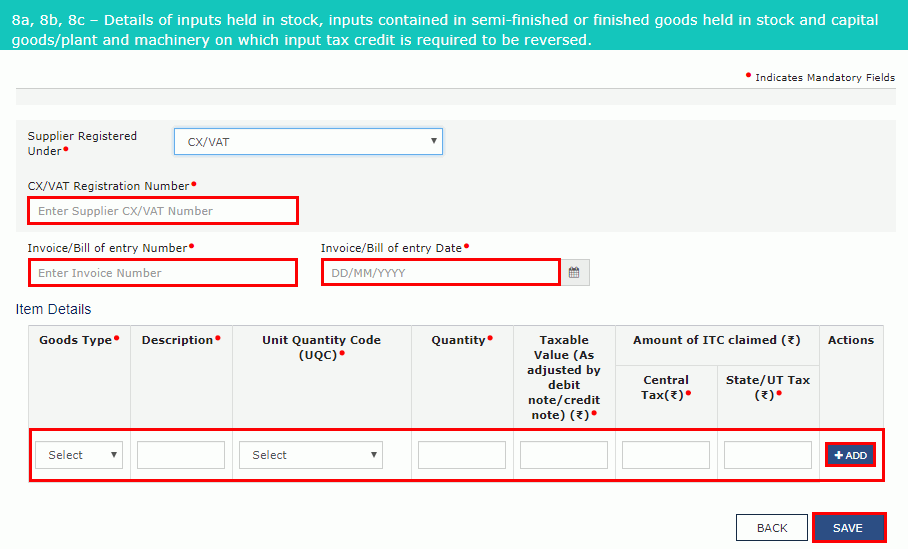
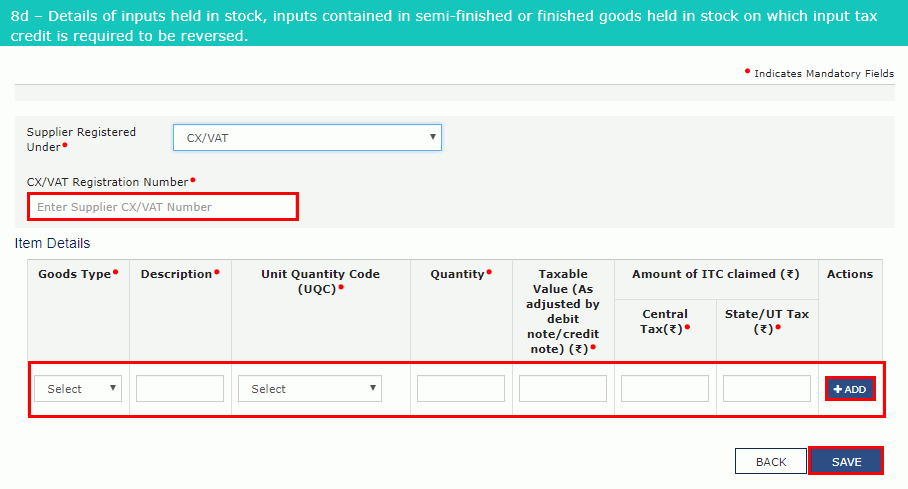
- Enter the details of the CX/VAT number, then fill in the invoice number & date, then entry of goods and hit the add button and then the save button.
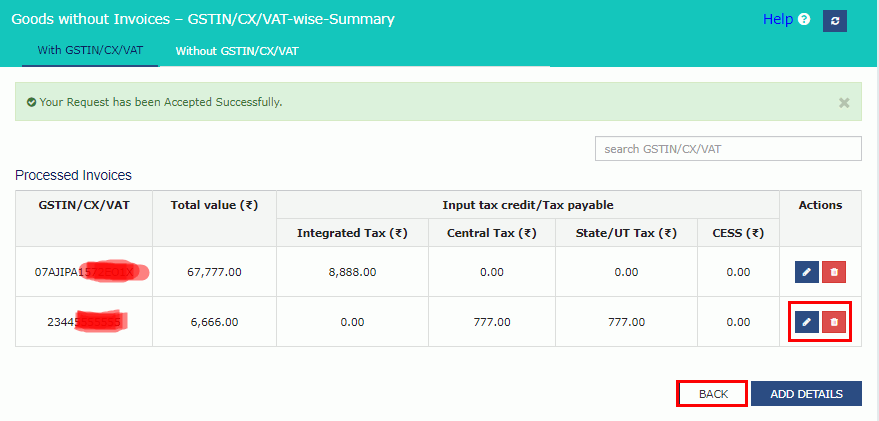
You can see the successful status in the image below. It will display the same on your screen.
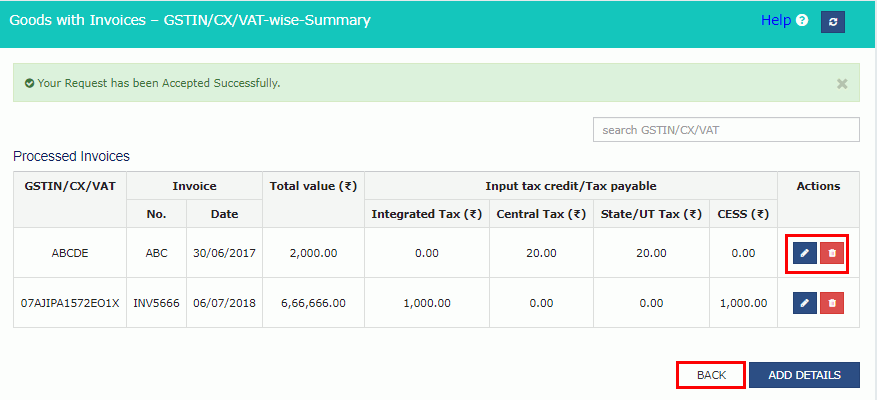
And, eventually, you will be redirected to the dashboard of GSTR 10.
For goods without invoices details:
- Press the option of – Goods Without Invoices Details .
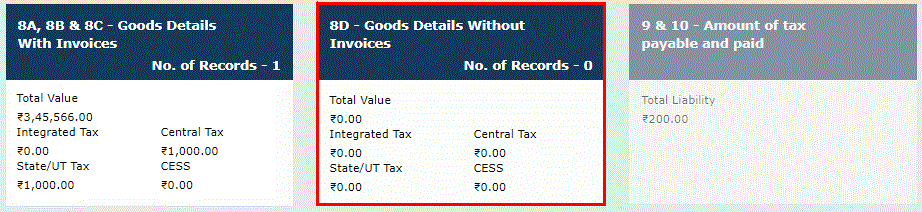
- Press the tab with GSTIN/ CX/ VAT and press on the add option to add the details.
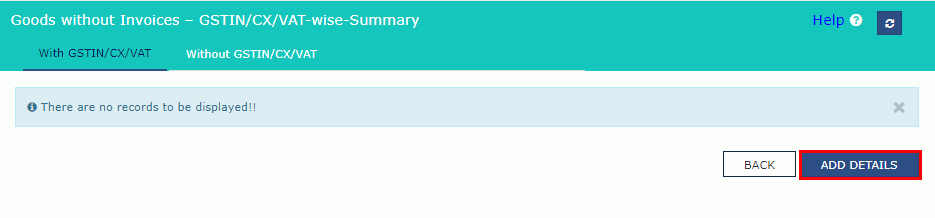
Now, select the relevant registration of the supplier from the list.
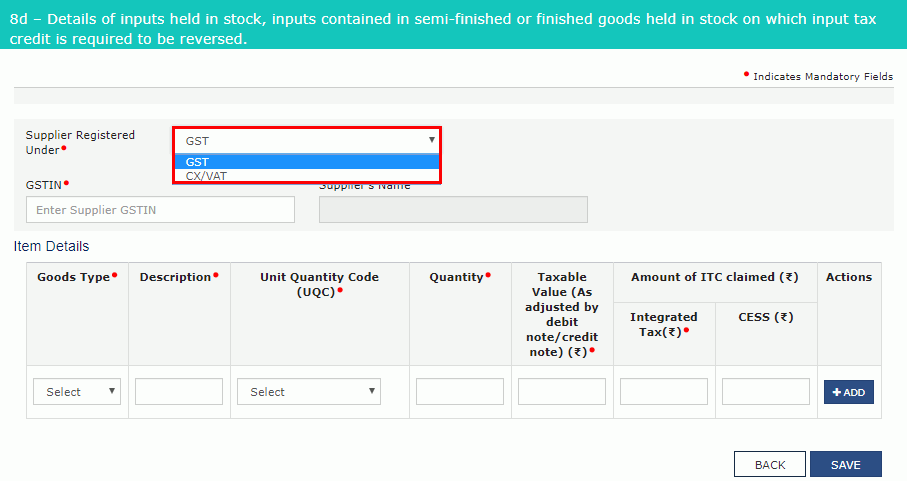
- Now, as a taxpayer you have to enter the GSTIN number, invoice or bill number, invoice date, information of goods, and then press add and save option.
The successful message will display as shown in the image below:
- Enter the CX/ VAT number then add the information of goods then press add and save option.
 The successful status will be displayed as shown below.
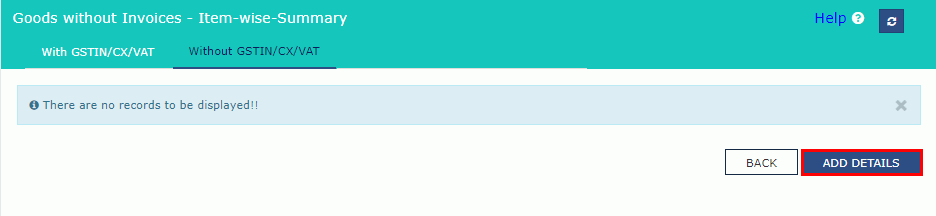
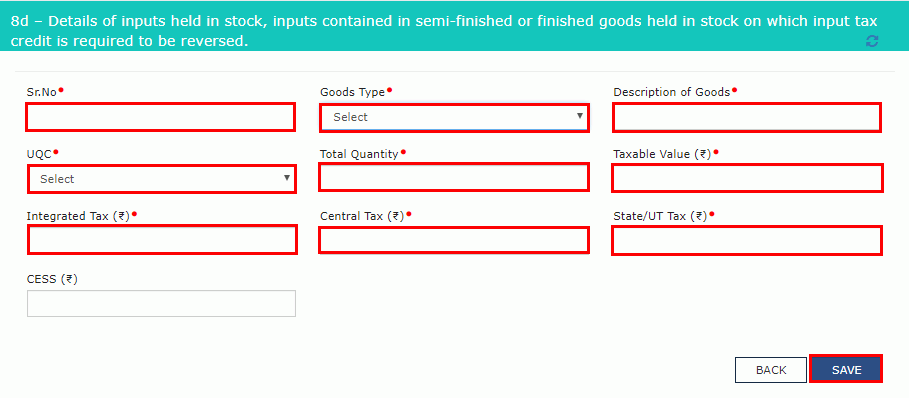
For goods without GSTIN/ CX/ VAT:
- You have to press the option – Without GSTIN/ CX/ VAT
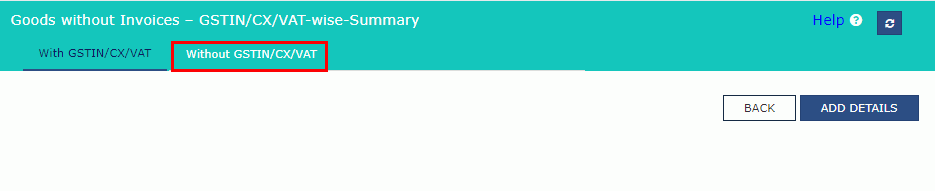
- Now, press on the option of – Add Details.
- Enter the information such as – serial number, types of goods, description of all the goods, select UQC, entire quantity, total taxable value, and integrated tax, central tax, state tax information.
The status of success will be displayed on the screen.
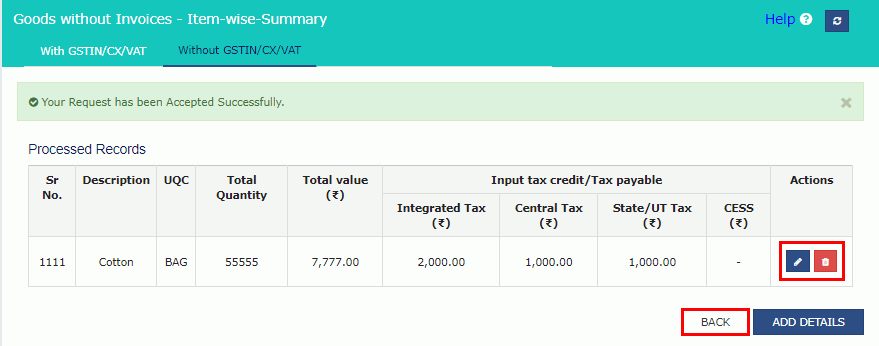
Now the portal will direct you to the GSTR-10 Dashboard page.

Step 11: Verify the form once you enter all the information.
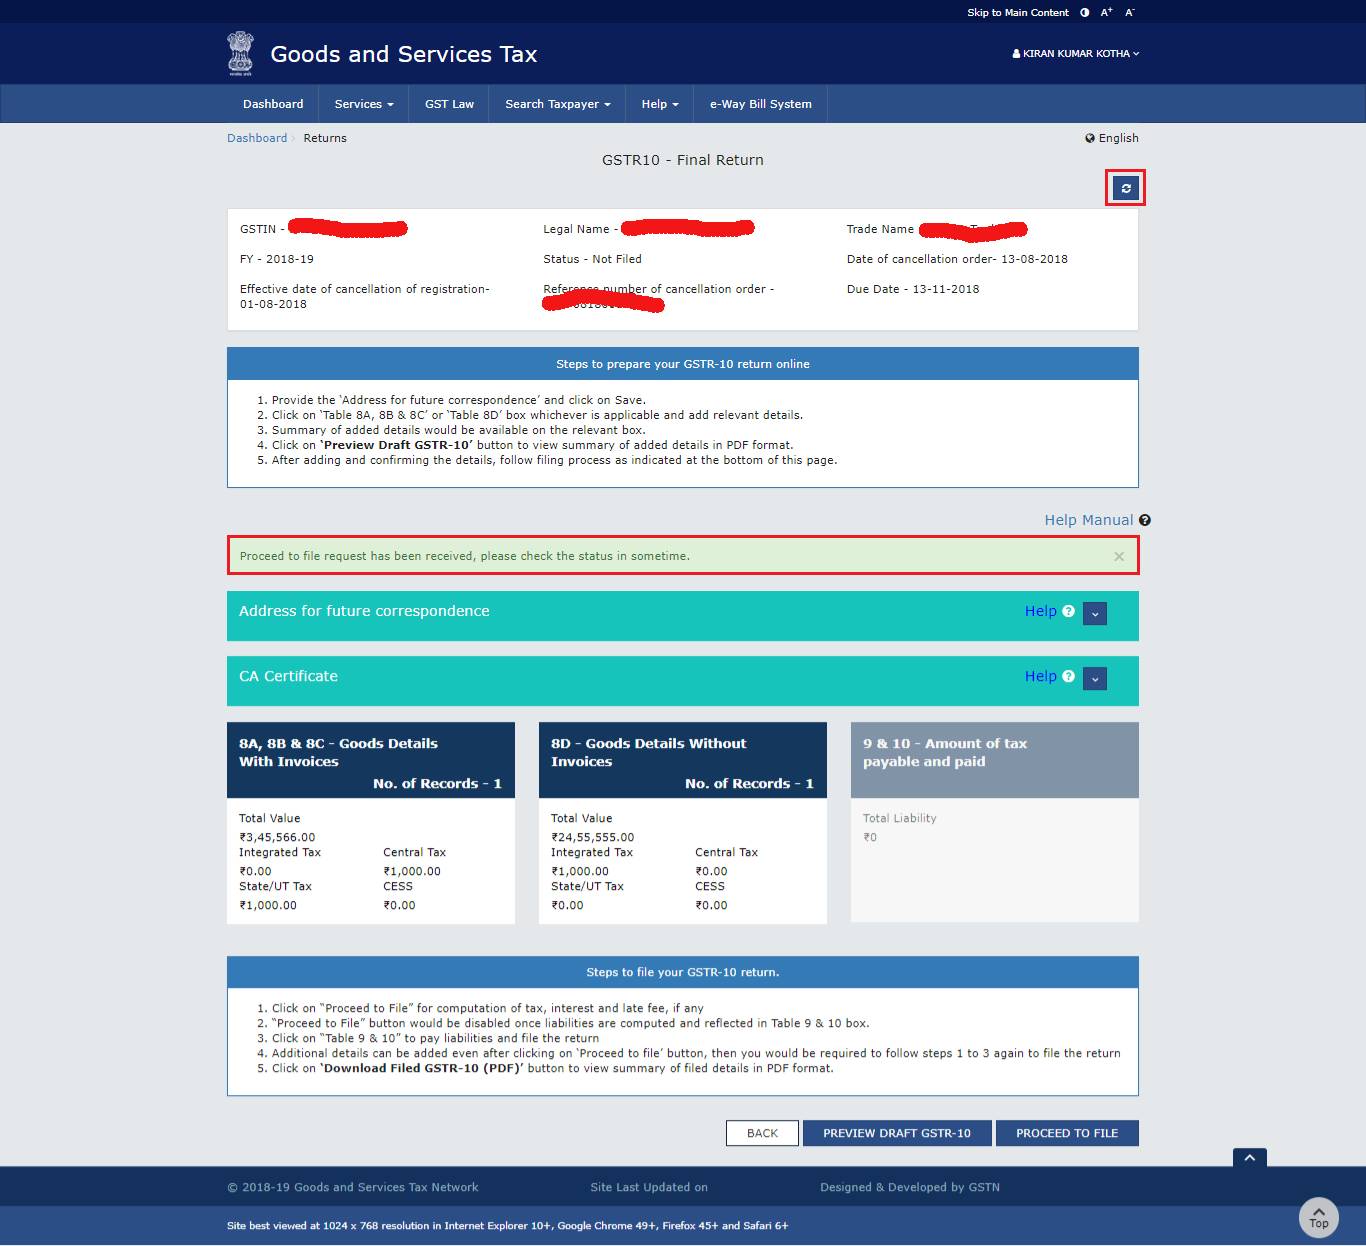
Step 12: Press the option to proceed to file.
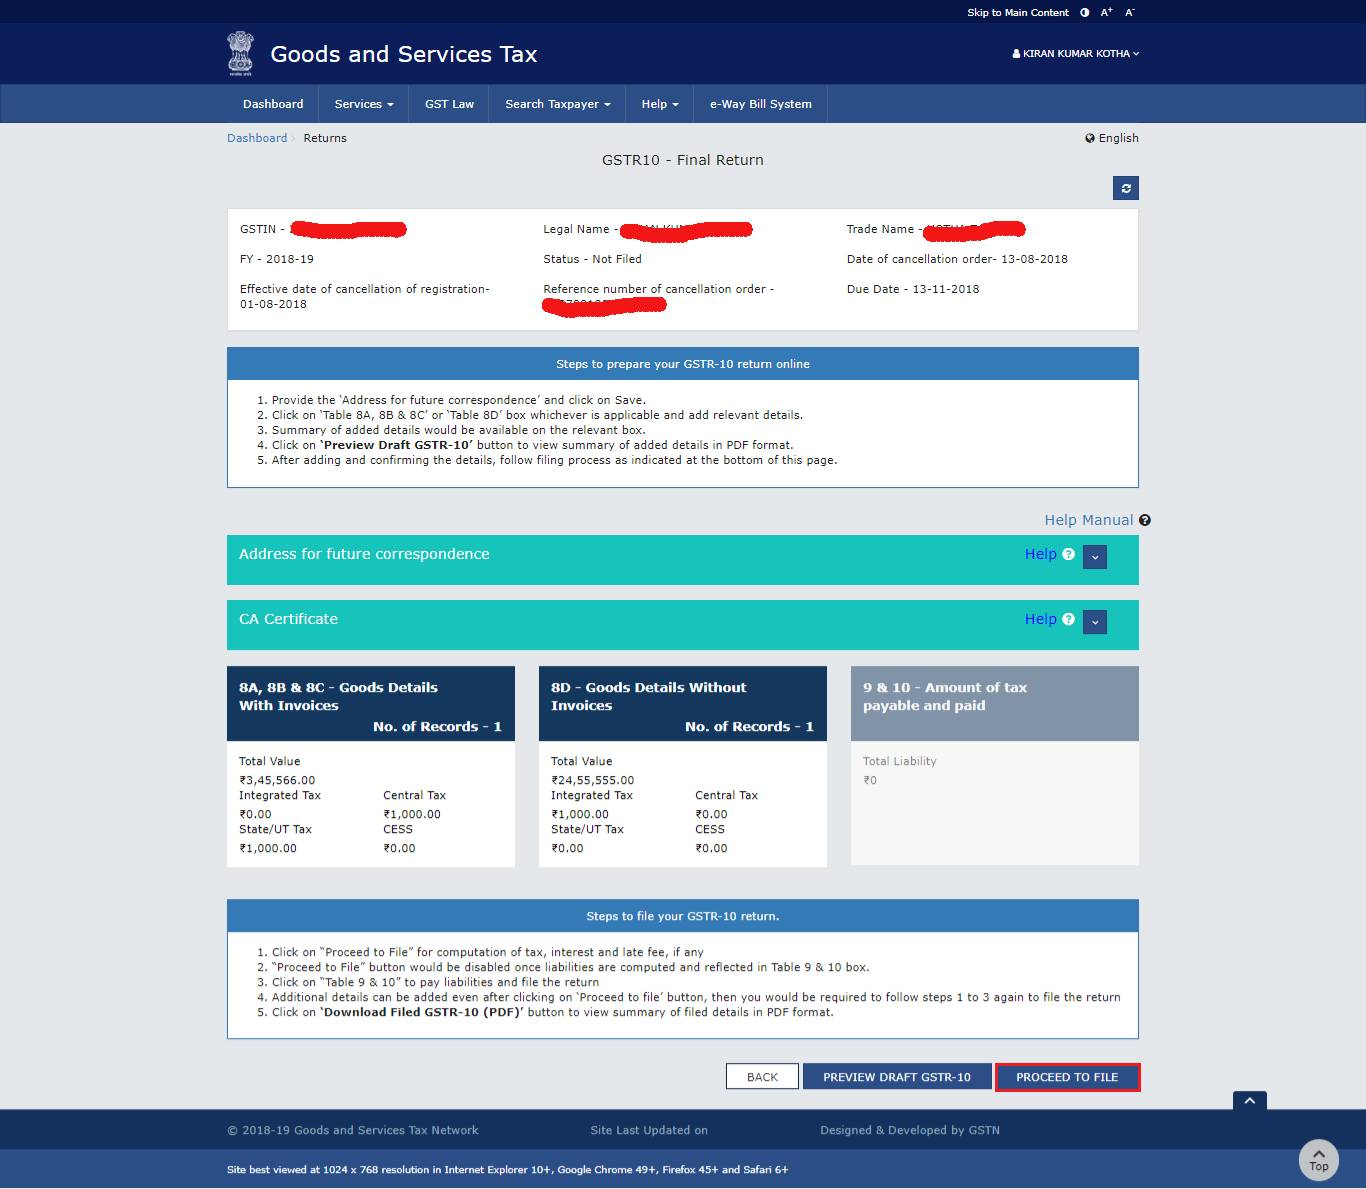
On the top page, the GST portal will show a message stating the request of proceeding the file is received. You have to click on refresh to get the accurate status.
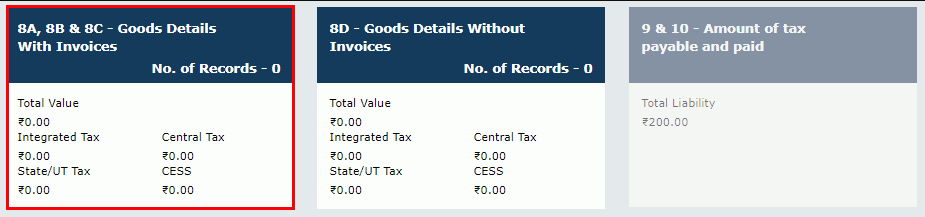
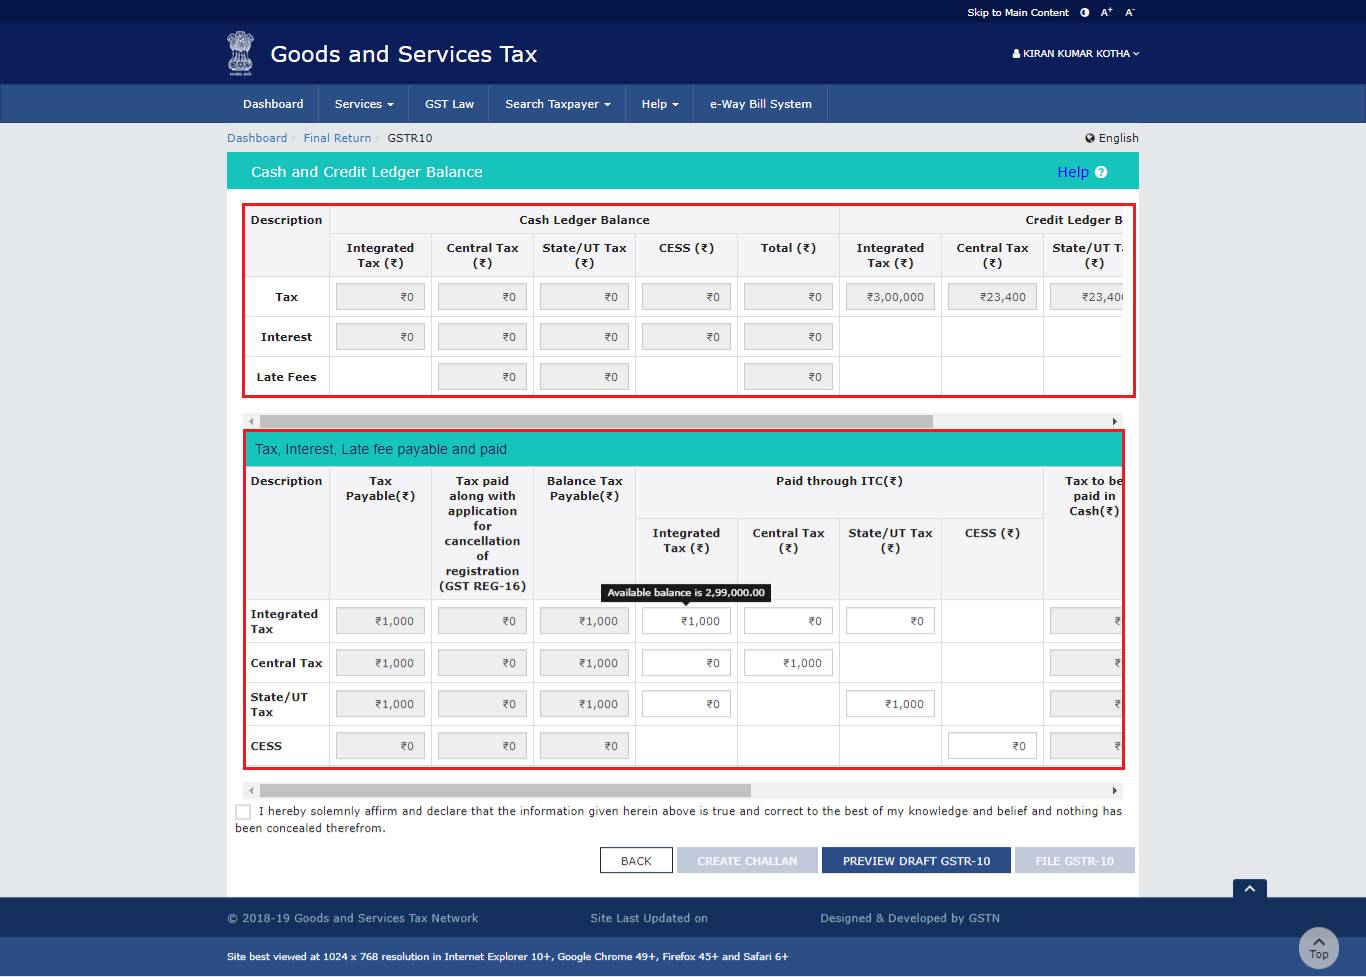
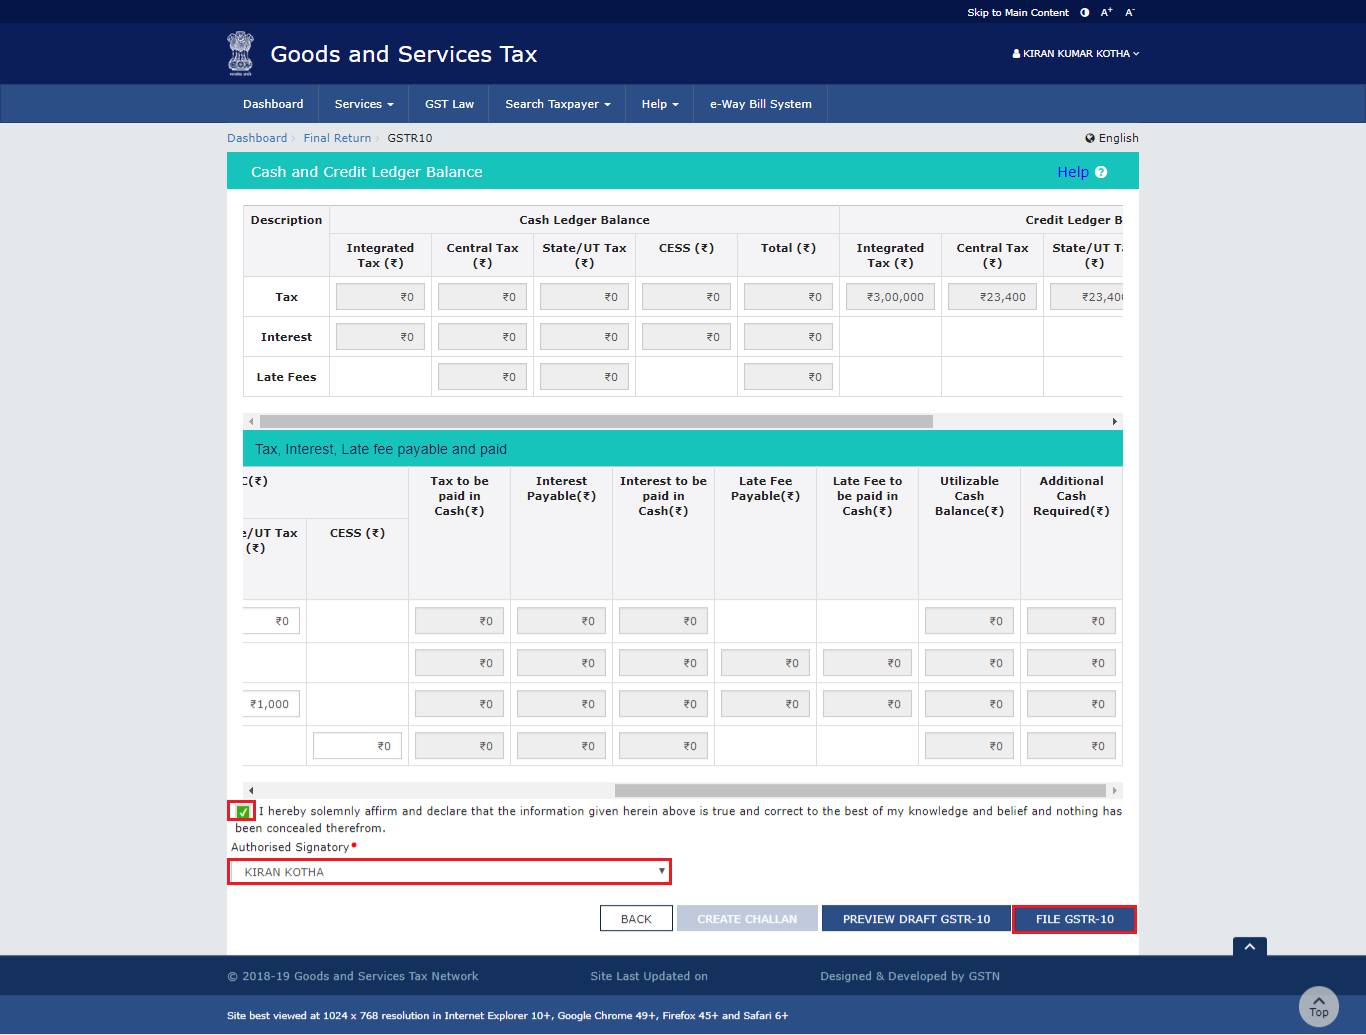
Step 13: Hit on the option that displays the payable amount of tax and paid amount in the tiles.
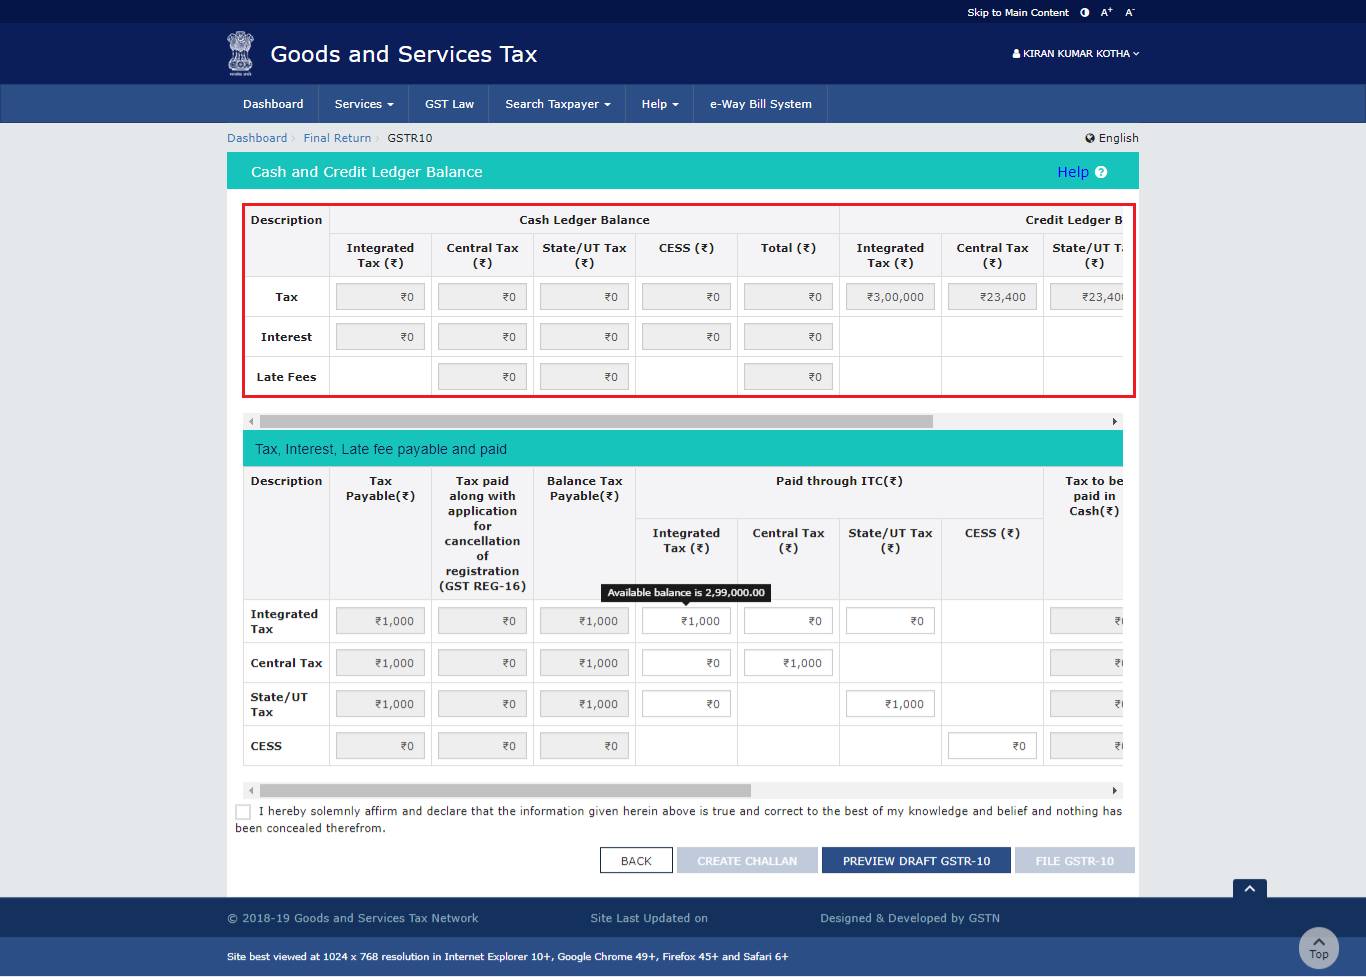
Here is how the portal will show all the available cash and credit ledger balances on your screen.
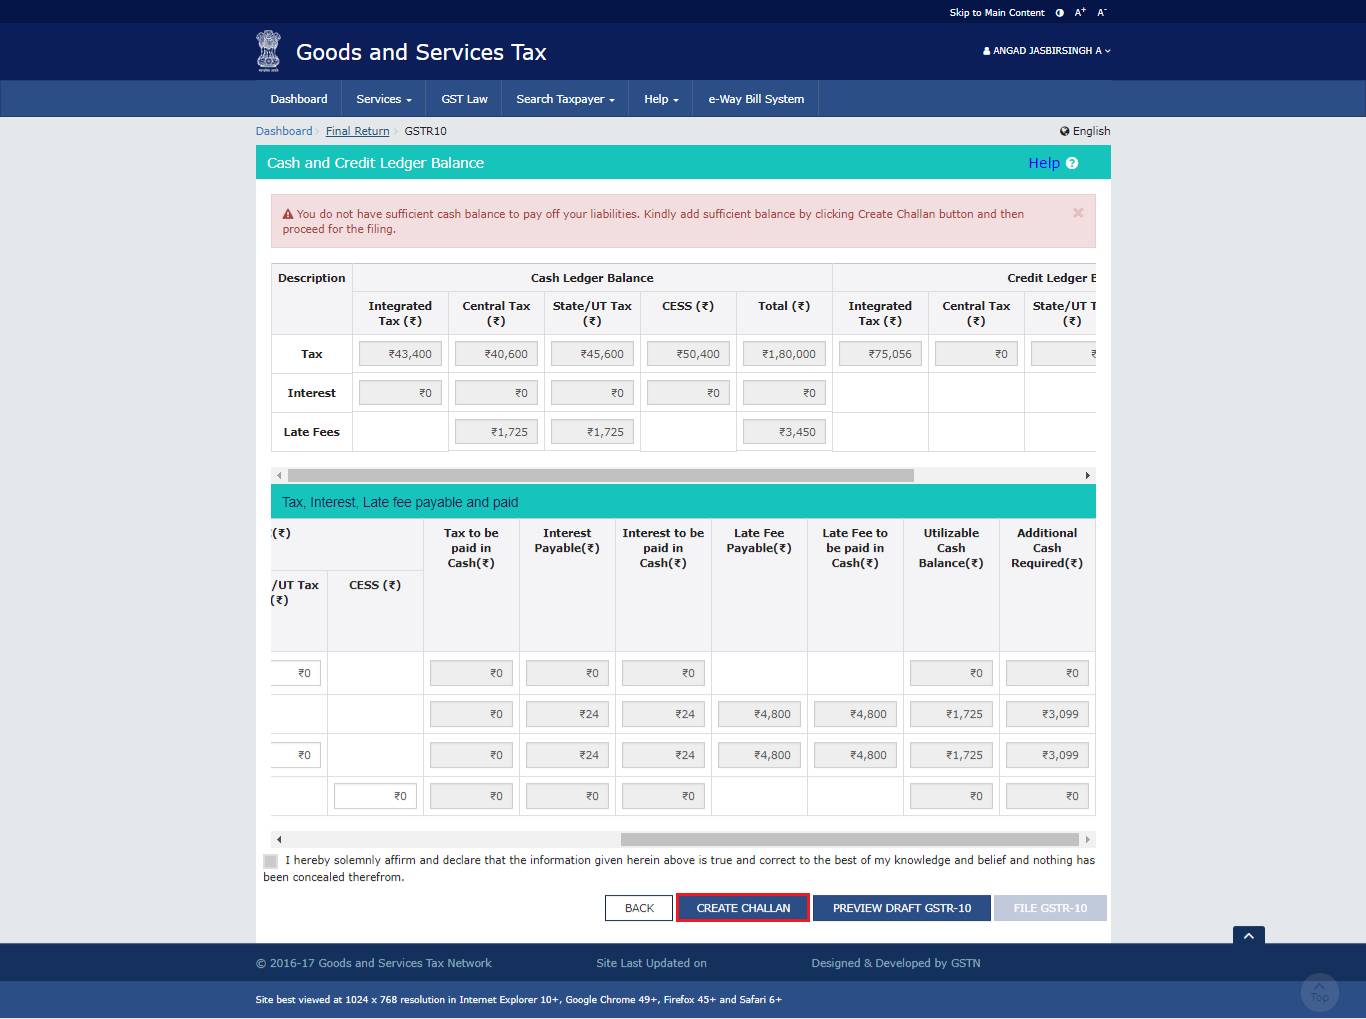
Step 14: Hit the generate Challan option.
In case, the available amount is less than the balance necessary to pay off the liabilities then a partial payment can be made by using the amount from e-cash or credit ledger. However, one can directly create the challan as well.
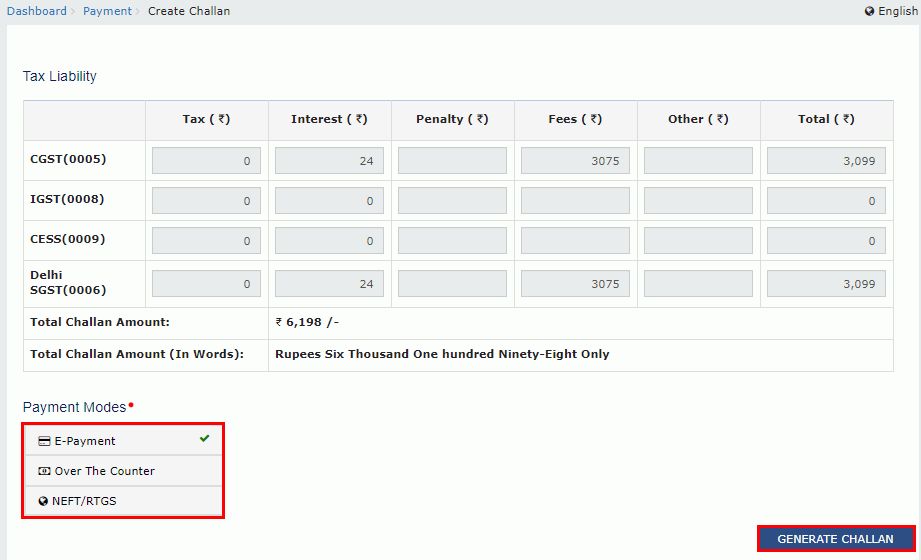
And, the challan page will display as shown in the image.
Step 15: Choose the most suitable payment mode such as – E-payment or over the counter or the NEFT/RTGS process.
Step 16: Now, press the option for generating the Challan.
Here is a glimpse of the challan created by you.
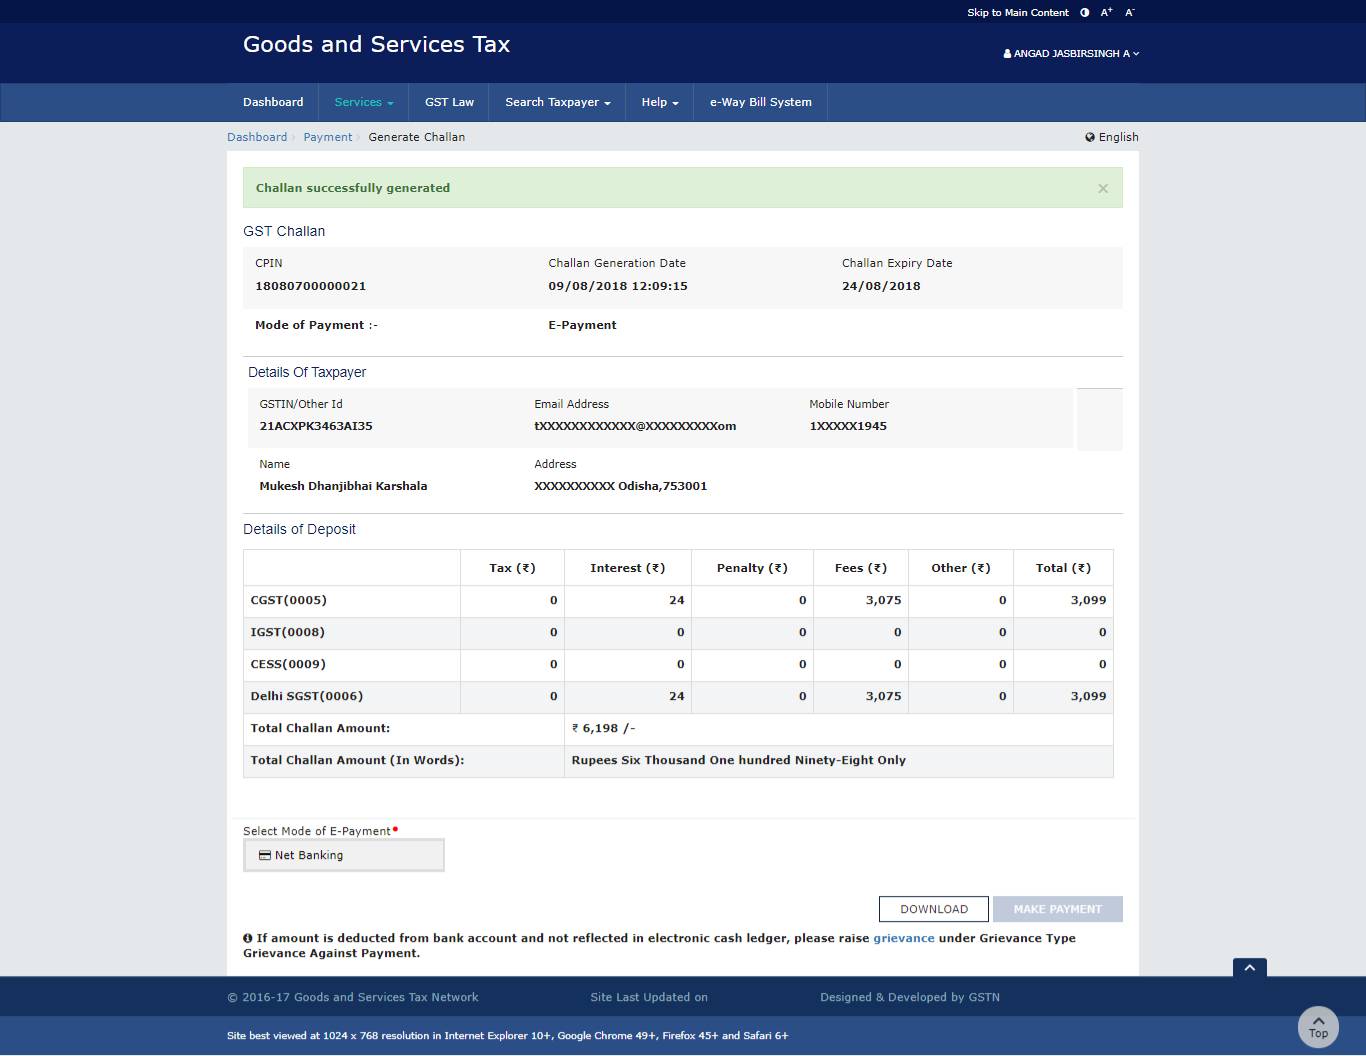
You can select the payment method as per your choice:
Net Banking: Once you select this payment mode, you will be redirected to the GST portal where the final transaction status will be shown after you pay the amount.
Over the Counter: You have to print the challan and visit the bank and use either cash or cheque or demand draft to pay the amount. Once the bank accepts the amount, it will be displayed on the GST portal.
NEFT/ RTGS: Take the print of the challan and visit the bank along with the mandatory form generated simultaneously. Now, you will pay using a cheque or debit card facility. After the confirmation from the bank, you can check the status at the GST portal.
Note: If the balance in the e-cash and credit ledger is equal to or more as compared to the offset liabilities then one must pay the liabilities with all the available funding.
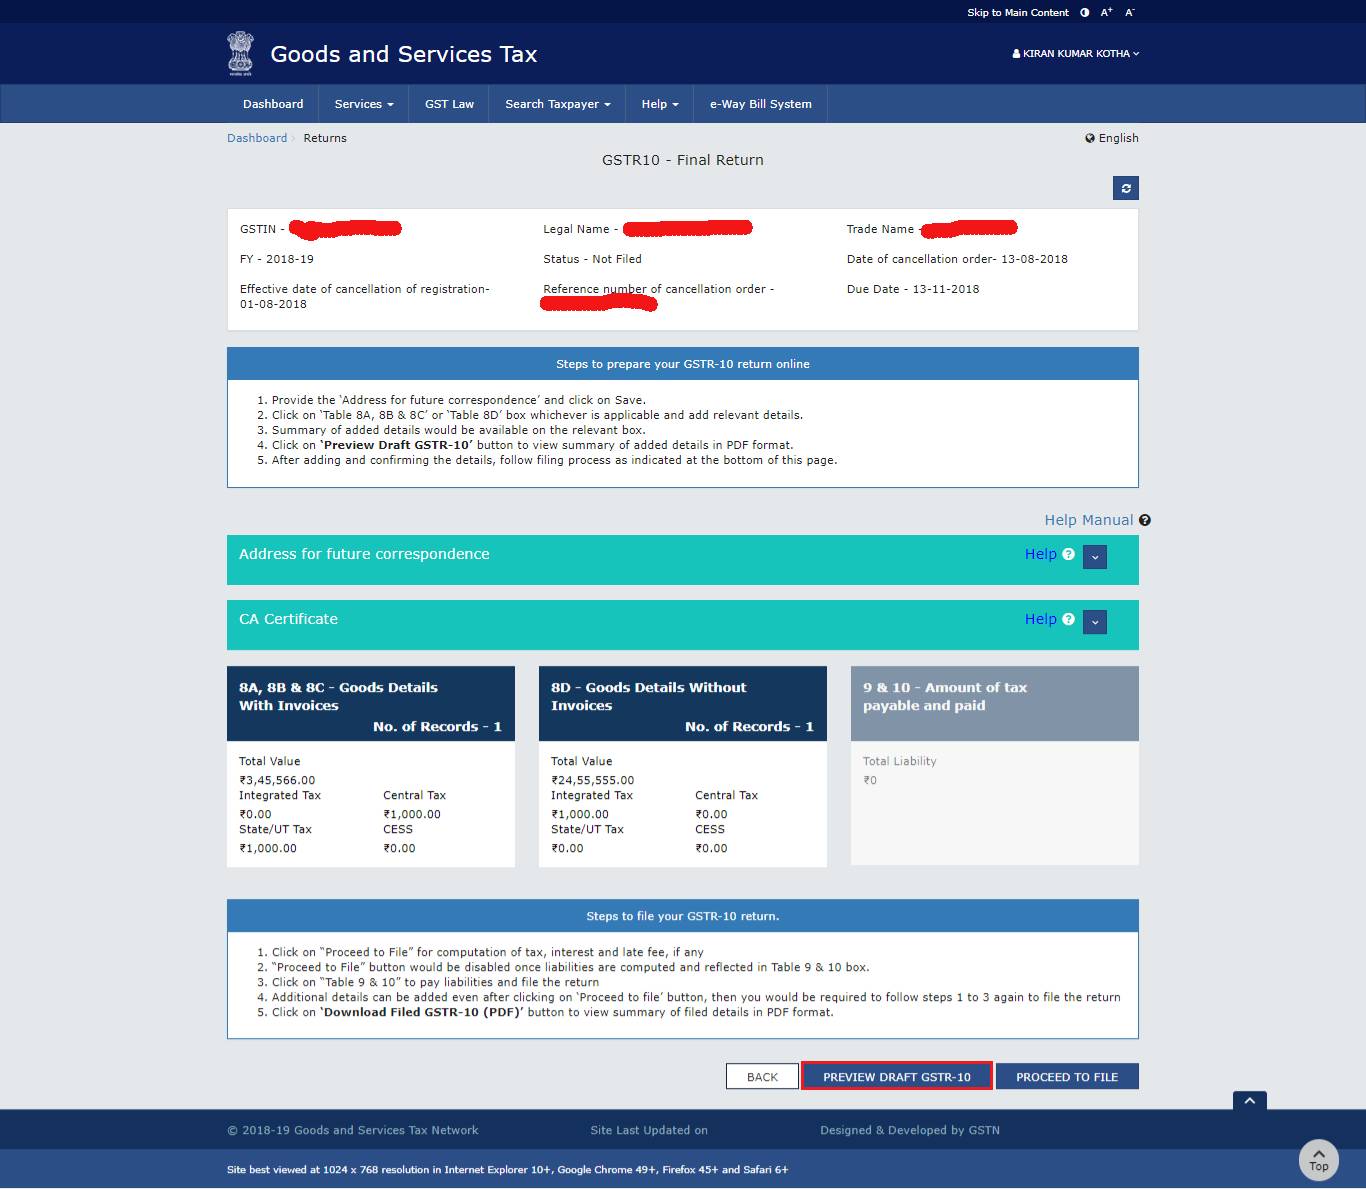
Step 17: To see the preview draft of GSTR 10 click on the review option.
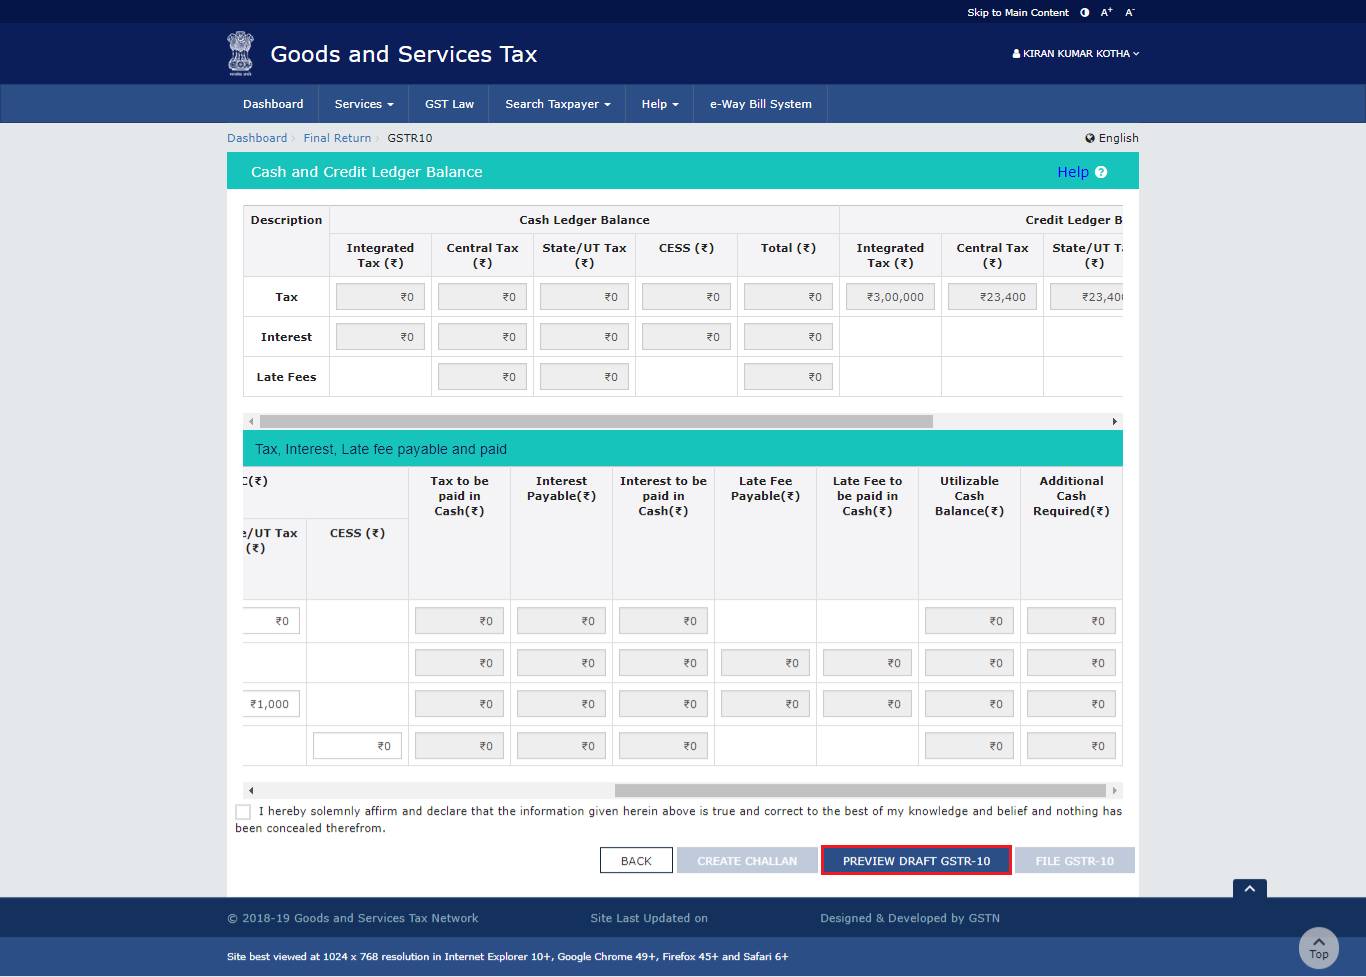
You can see the below image to know how it will disappear on your screen.
Filing Form GSTR-10:
Step 1: You have to choose the declaration checkbox.
Step 2: Now the taxpaying individual will be the select authorized signatory.
Step 3: Press the File GSTR-10.
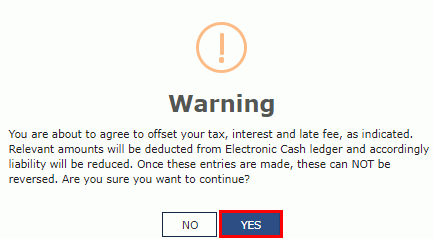
Step 4: Hit the Yes button when the screen depicts the ‘Submit Application’ page.
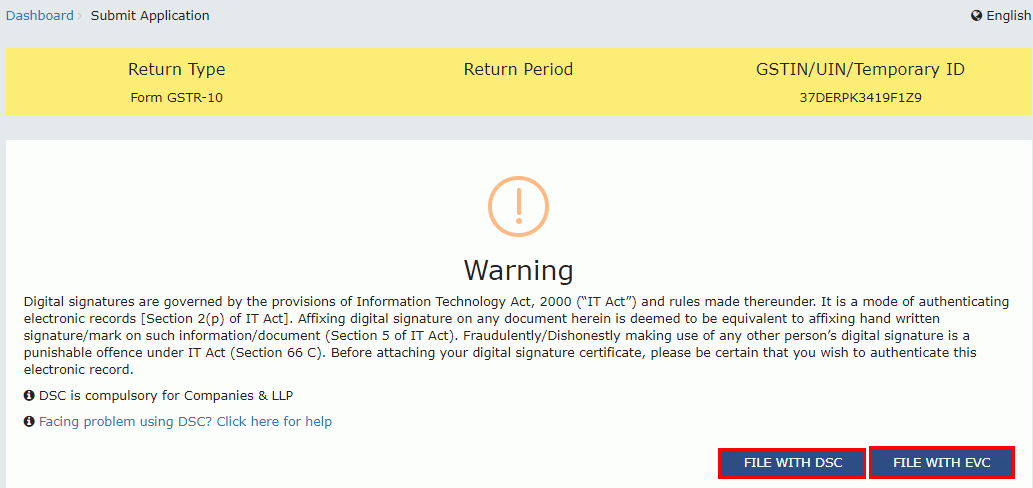
Step 5: Now the taxpayer will file with DSC (Digital Signature Certificate) or File using the EVC process.

Here is the image displaying a successful message on the portal. And the status is changed to filed. Now, a tax-paying person will hit the back button.
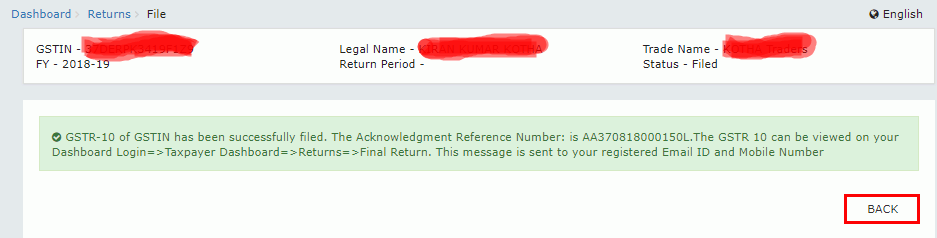
Once an individual submits the form the portal will generate ARN and the individual will receive a confirmation message on their registered email and mobile phone number. Now, the portal will update the e-cash and credit ledger and electronic liability register part 1. And, finally, the portal will save the return file in its record search that will only be accessible by an authorized person.
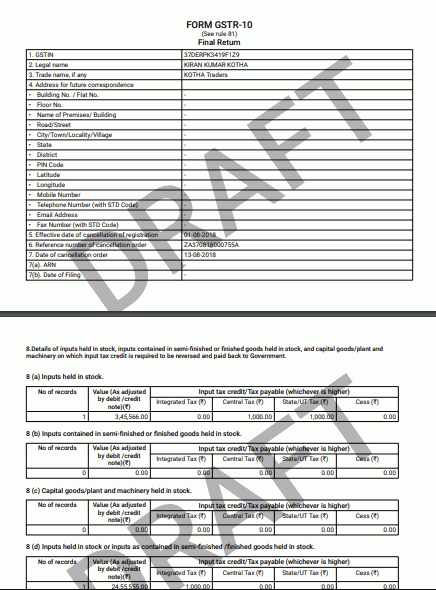
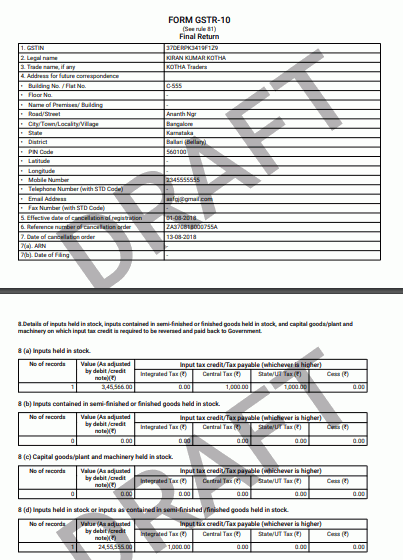
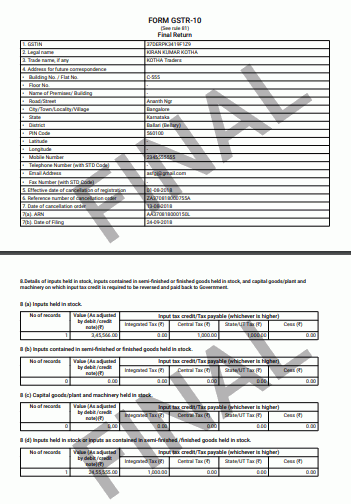
Step 6: Click the preview option to see the Final GSTR-10.
There will be a watermark of the final Form GSTR-10 on the downloaded PDF as shown.
What records an individual has to maintain after the cancellation of GST?
Any tax paying individual has to maintain some records even after filing the GSTR 10 final return. Here are some records one should continue to maintain.
- The purchase register.
- Register of all the goods produced.
- The register of stock.
- The register of sales.
- Avail ITC
- The output liability of tax.
- The output tax paid.
Let’s Summarize:
In the end, we can only say that the procedure of filing GSTR 10 final returns is a bit complicated. But we have tried our best to make the details, format, and filing process of GSTR 10 on the GST portal quite clear. However, if you still have any query or doubt make sure to comment and ask. We will be glad to assist you.
YOU MAY ALSO LIKE
Frequently Asked Questions (FAQ’s)
Is the GSTR 10 certificate mandatory?
No, a GSTR 10 certificate is not mandatory if an individual has already registered as a taxpayer under GST.
How do I file my GSTR 10 after cancellation?
You have to log in to the portal, enter your credentials, press the final return option, enter your address, and click on the save option. After which you have to enter your cost accountant details, attach the documents, click on save CA, then enter information in several tiles, once preview the form, and click on proceed. Again you have to click on payable tax and create challan. Now you can check the draft preview of GSTR 10, and that is how you file GSTR-10 after cancellation.
What is the difference between a Final return and an Annual return?
The final return is filled by an individual whose registration was cancelled, whereas, the annual return is required to be filed by every person registered as a taxpayer under GST.
Can a taxpayer file a NIL return in the form of GSTR 10?
Yes, one can file the NIL return in the form of GSTR 10.
Is it possible to revise GSTR 10?
No, it is not possible to revise the return form GSTR-10.
What are the prerequisites for filing GSTR 10?
The pre-requisites for filing GSTR-10 is: taxpayers need valid credentials and must apply for cancellation of registration.
Is it mandatory to file GSTR 10 return?
No, it is not mandatory for everyone. The GSTR 10 is filled by the taxpayers whose registration under GST has been cancelled or surrendered.